Home / All Recipes / Chinese / Ham and Mayonnaise Bread Rolls
Ham and Mayonnaise Bread Rolls
How to bake Asian bakery style ham and mayonnaise bread with nori seaweed sprinkles, with detailed step-by-step guide to shaping the bread roll.
Stepping into an Asian bakery, be it Chinese, Japanese, or Korean is like stepping into bread heaven. These bakeries share roughly the same kind of dough recipe that yields soft, pillowy, milky, buttery, and almost always filled with all sort of wonderful ingredients ranging from sweet filling such as bean paste, custard, and sweet cream to savory filling such as this ham and mayonnaise, sausage, meat floss, and pizza toppings. If you have ever stepped into an Asian bakery, you know what I am talking about. Today, let me share with you one of my Asian bakery favorite bread, ham and mayonnaise bread rolls.

Blackforest Ham and Japanese Kewpie Mayonnaise
Personally, I prefer bread with sweet filling more than the ones with savory filling, but my husband is the other way round, so of course I have to compromise and alternate between making bread with sweet and savory filling at home. To make these ham and mayonnaise bread rolls, I always rely on these two main ingredients:
- Black Forest ham from Costco, I love these, but you can use any kind of sliced ham, or even other sliced deli meat of your choice.
- Japanese Kewpie mayonnaise, you can use regular mayonnaise but Japanese Kewpie mayonnaise actually tastes different and to me packs more punch than regular mayo.
If your grocery doesn’t have Kewpie mayonnaise and you want to make it yourself, here is a good approximate shortcut that should get pretty close to the real deal. Simply mix together 1 cup regular American mayonnaise, 2 tablespoon Japanese rice vinegar, and 1 tablespoon sugar.
How to Shape Ham and Mayonnaise Bread Rolls
I learn about the method to prepare this ham and mayonnaise bread rolls from a Japanese cooks community, don’t you think this is such a fun way to shape the bread? I took multiple photos showing the step-by-step on how to make this roll, and I hope the photos along with my instruction will provide enough guidance to shape the bread rolls.
- Divide the proofed bread dough into 12 equal portions.
- Flatten each portion into a circle the size of the ham slices you are using.
- Place a slice of ham on top of the dough.
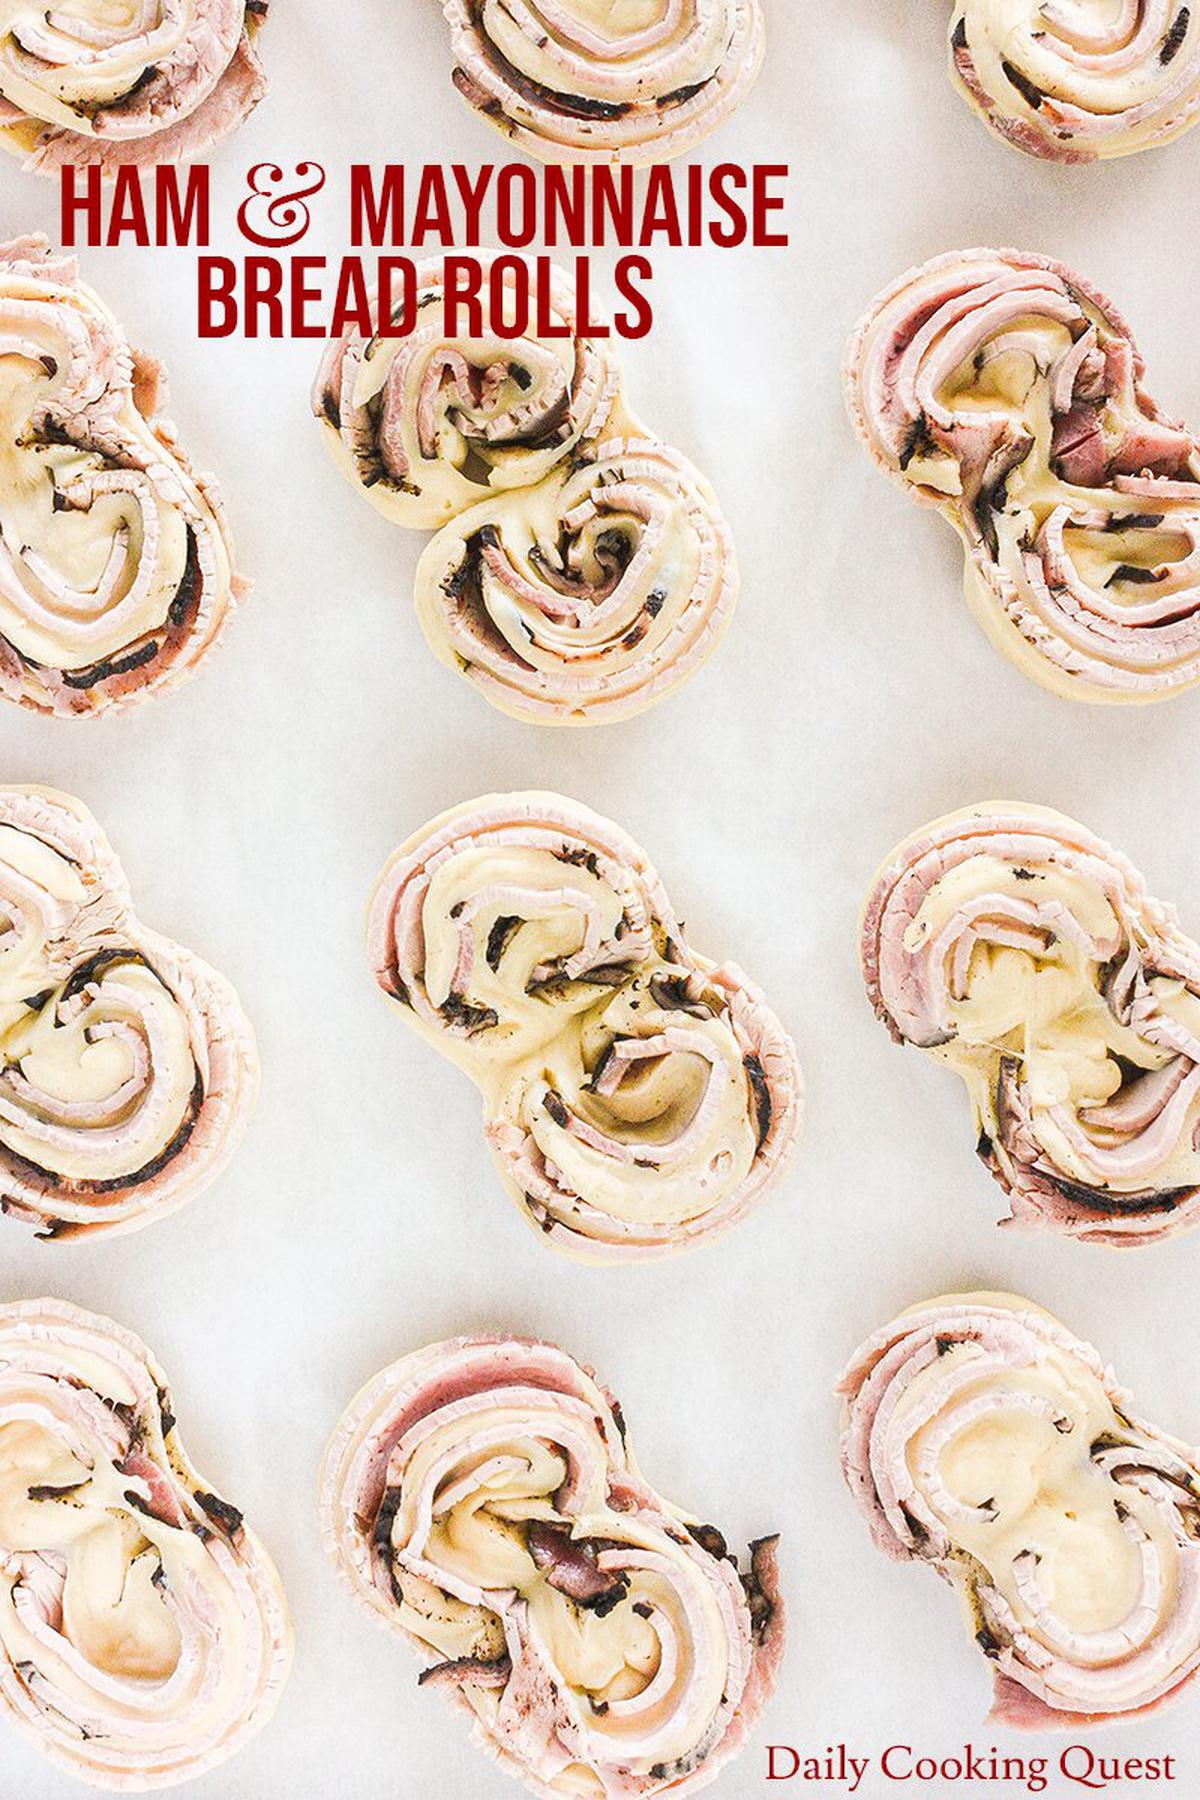
- Roll into a log, then connect the two ends of the log to create a snail.
- Stand the snail with the connected ends touching cutting board, cut into two discs about 80% through, so the two discs are not totally cut apart, then open up the discs to display the pretty layers.
- Arrange on a half-sheet pan lined with a parchment paper.
Adding Mayonnaise After the Second Proofing
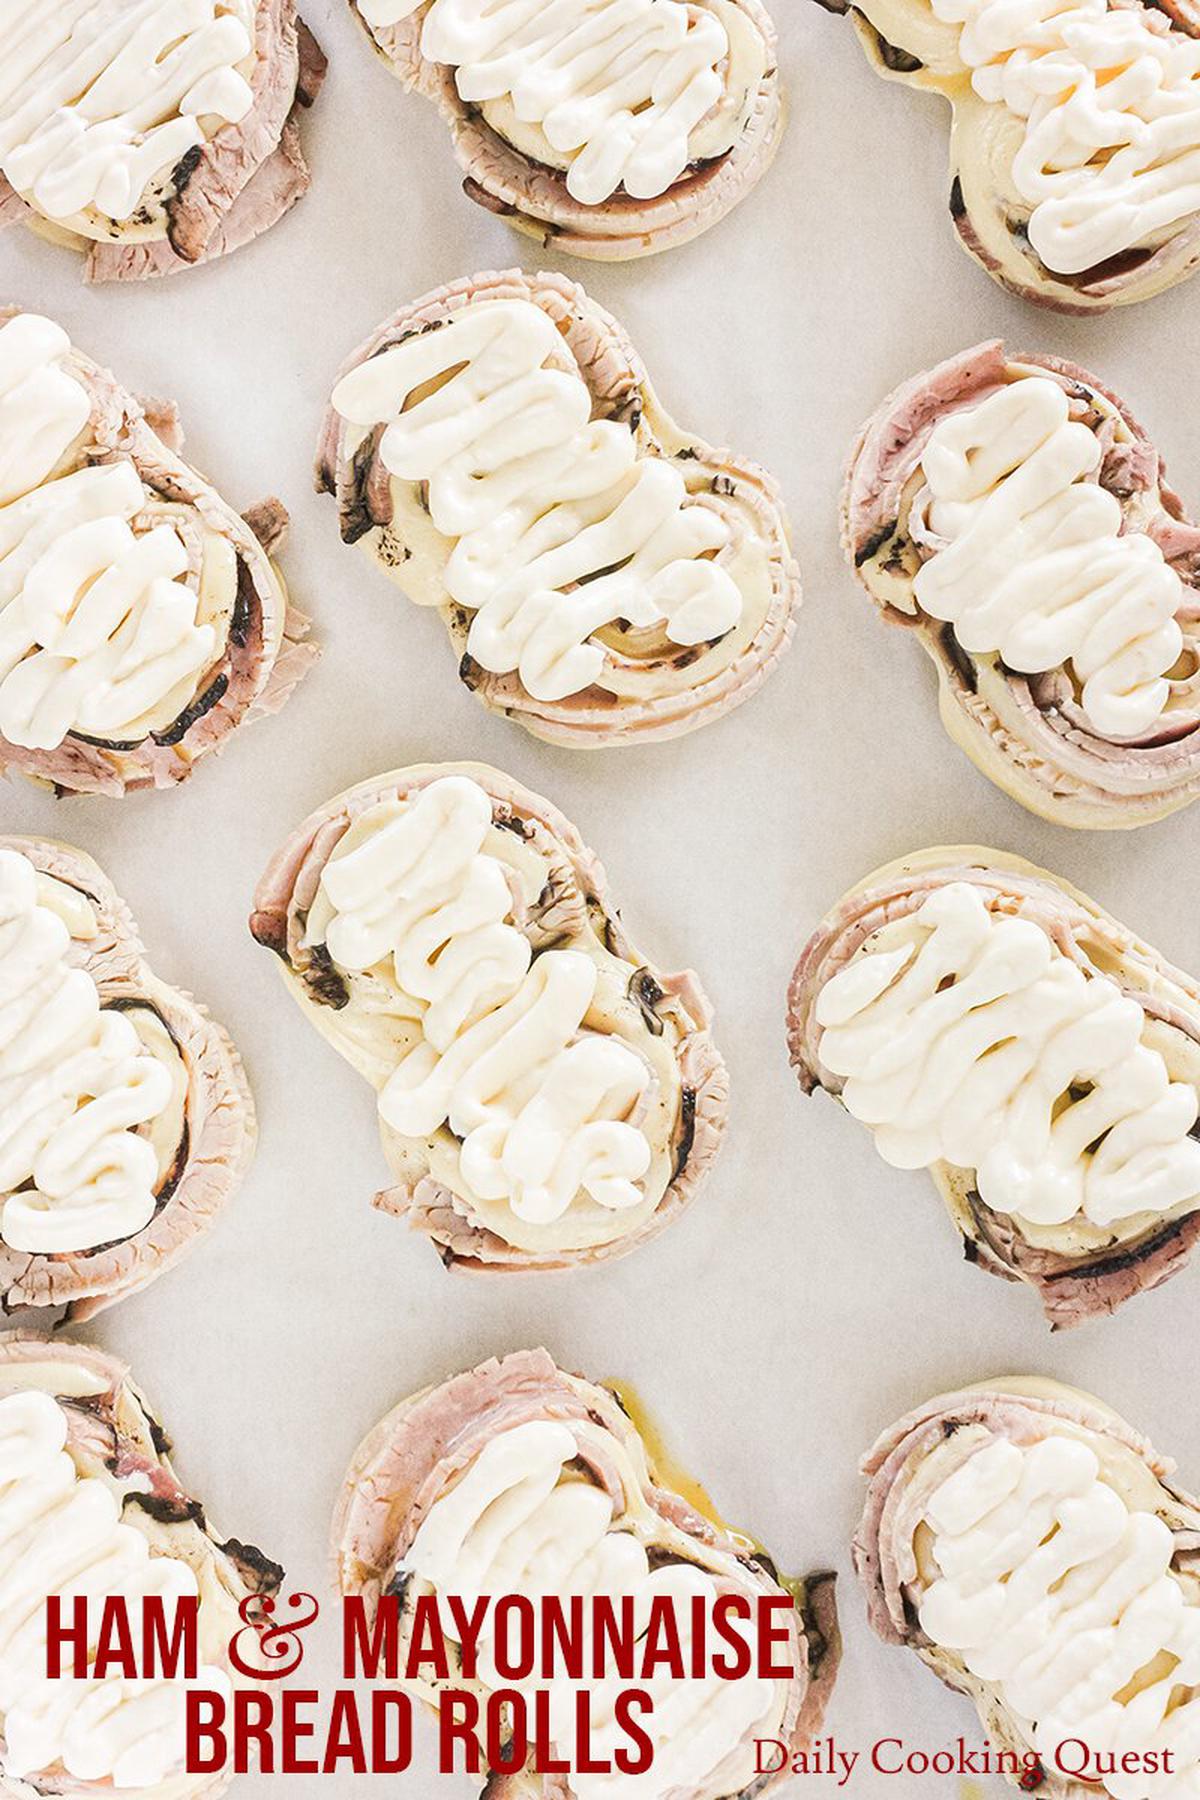
Once the bread rolls are all assembled and arranged on a half-sheet pan, you will need to rest the bread for a second proofing until they become puffy, and the volume is almost doubled. This is the right time to apply an egg wash and squeeze some mayonnaise on top of the proofed bread.
- If you use Japanese Kewpie mayo, you should be able to squeeze out the mayo directly from the bottle itself.
- If you prepare the approximate homemade version, you may want to transfer the mayo into a piping bag and pipe onto each bread roll.
Baking the Bread Rolls and Sprinkle with Nori Toppings
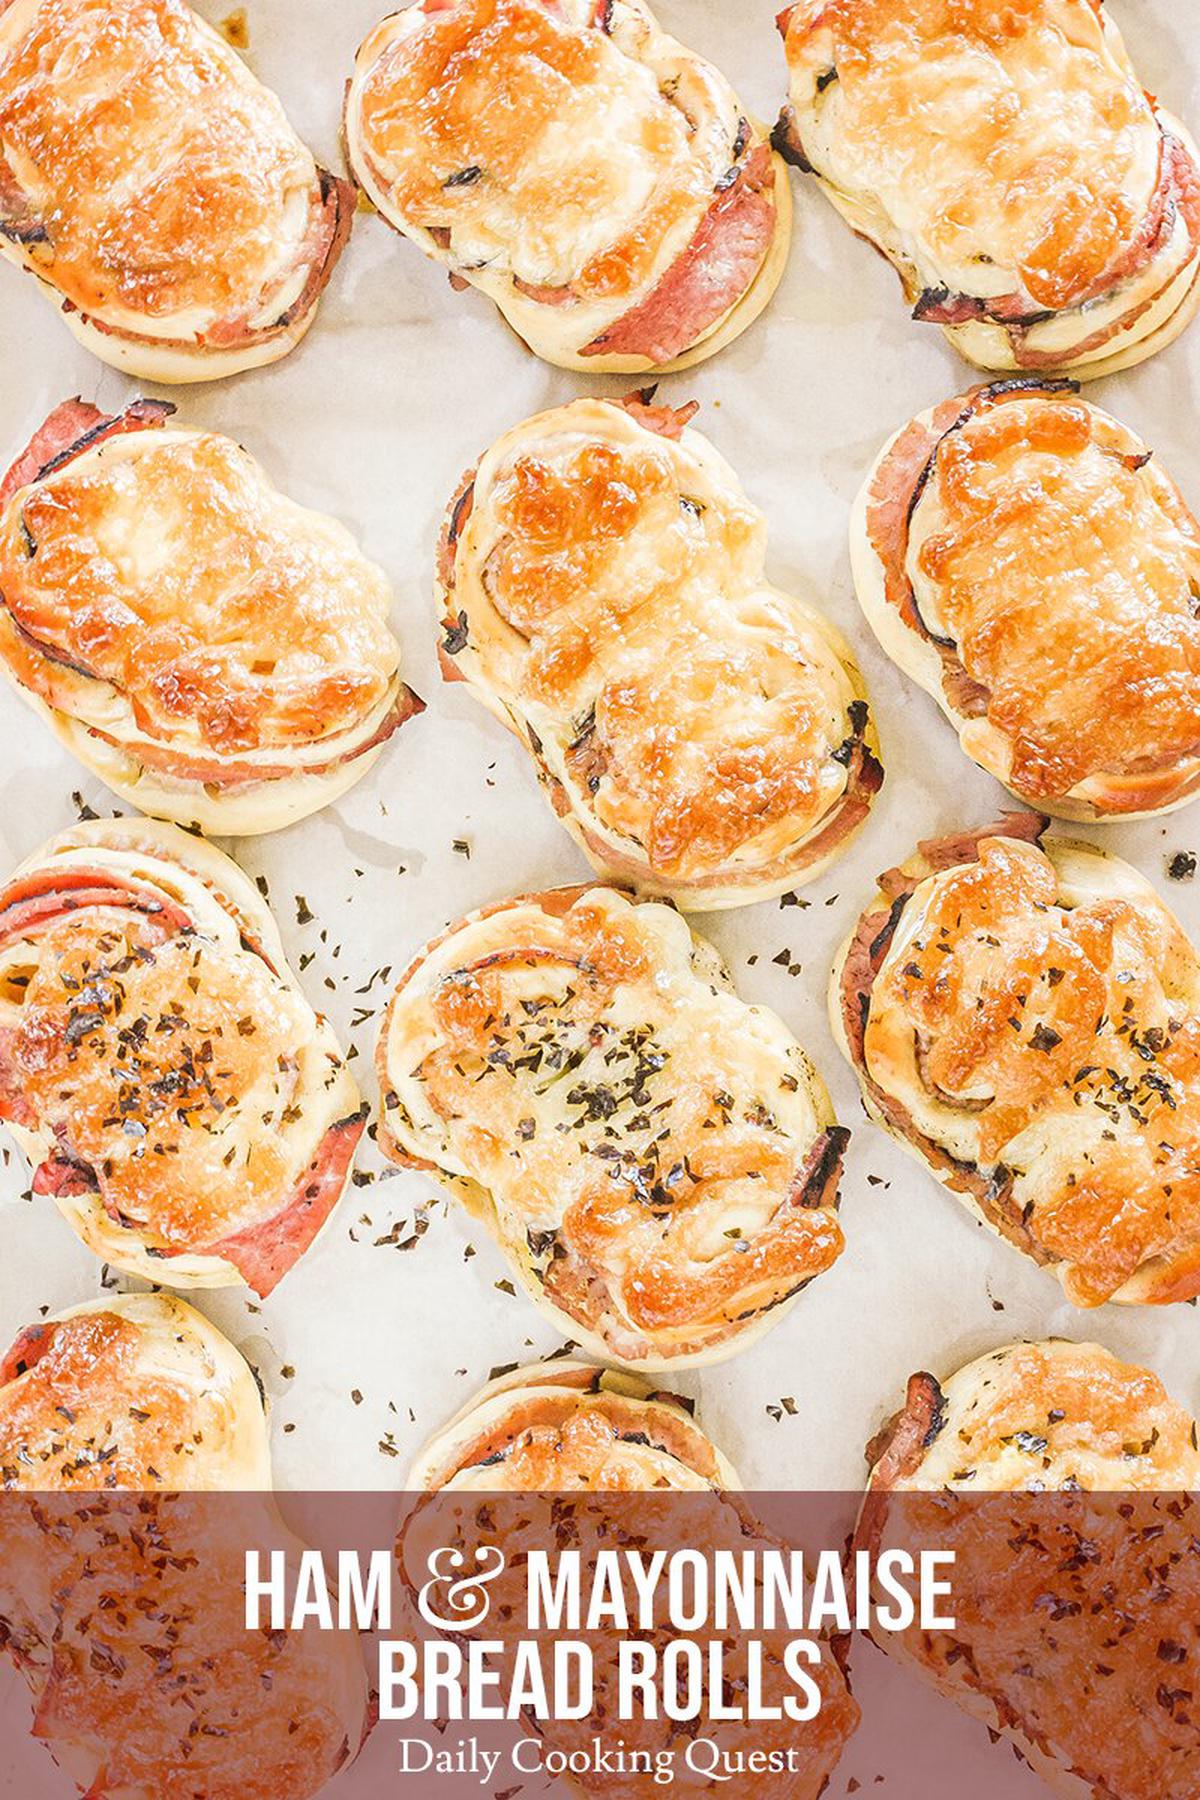
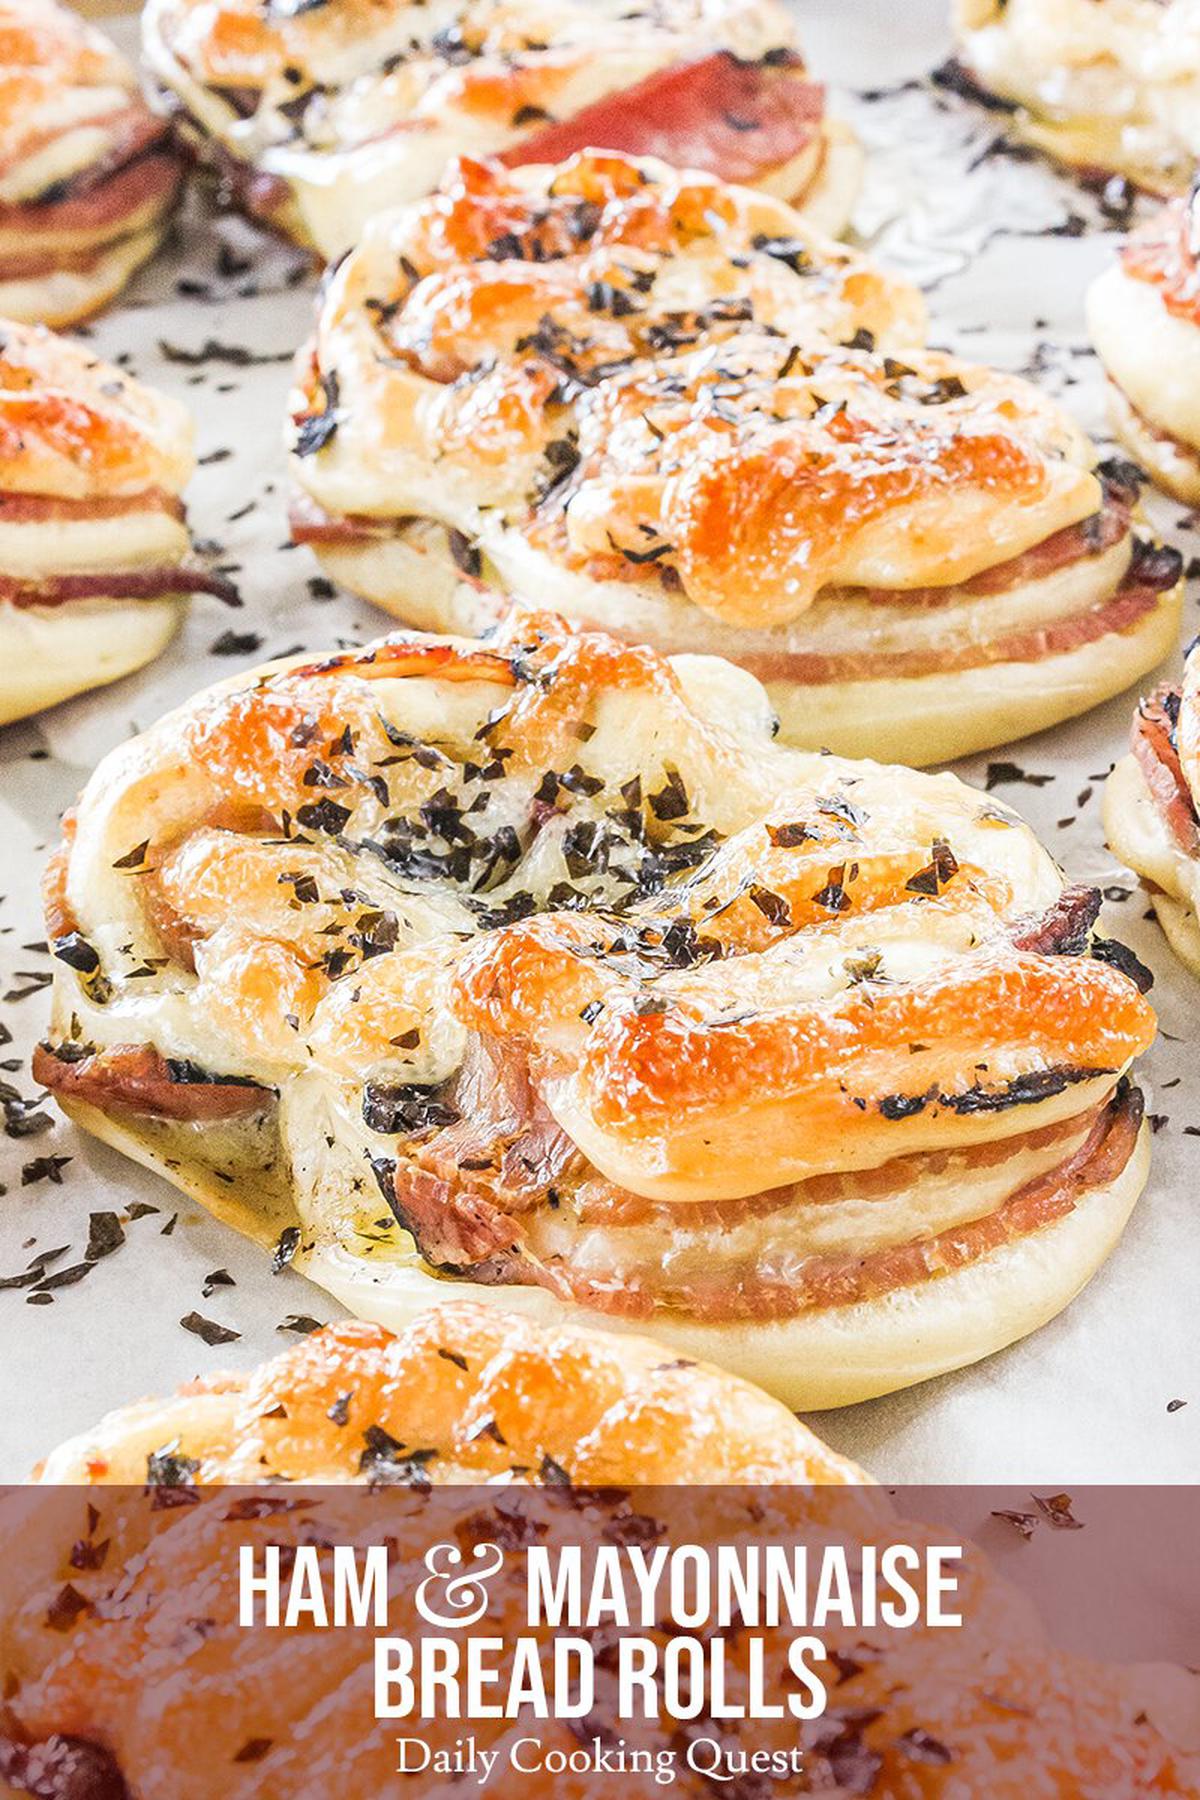
Once the oven is preheated to 200 Celsius (400 Fahrenheit), bake at middle rack for about 20-25 minutes until the bread is golden brown. Once the bread is out from the oven, you can sprinkle the bread with crushed toasted nori seaweed like what I do. If you don’t have nori at home, some chopped fresh parsley is a pretty good substitute, or just leave them plain.
How to Properly Store and Reheat the Bread Rolls
These ham and mayonnaise bread rolls are best eaten straight out from the oven and should keep fresh for up to 3 days when stored in an air-tight container in the fridge. Since these bread rolls contain meat and dairy, it is not advisable to store them outside of the fridge. When I want to eat the bread that has been stored in the fridge, I simply reheat the bread in a microwave for about 10-15 seconds to return them to their just out from the oven state.
Ham and Mayonnaise Bread Rolls
Ingredients
- 150 ml warm milk (38 Celsius or 100 Fahrenheit)
- 5 gram active dry yeast
- 5 gram sugar
- 300 gram all-purpose flour
- 10 gram sugar
- 4 gram salt
- 1 egg
- 2 tablespoon unsalted butter, room temperature
- 12 slices of Black Forest ham
- 1 egg
- 1 teaspoon water
- 1/2 cup Japanese Kewpie mayonnaise
- Garnish (optional)
- crushed toasted nori seaweed
- chopped fresh parsley leaves
Instructions
- Mix together warm milk, active dry yeast, and 5 gram sugar. Let rest for 20 minutes until foamy.
- In a large mixing bowl, whisk together all-purpose flour, 10 gram sugar, and salt. Make a well, then pour the foamy yeast solution, egg, and butter. Knead into a smooth, soft, elastic, and non-sticky dough. If the dough is too sticky, you may add 1-2 tablespoon of all-purpose flour. Kneading time is 20 minutes.
- Place the dough in the bowl, wrap with a wet kitchen towel or saran wrap. Let it proof until the volume is doubled, about 1 hour in warm kitchen.
- Punch the dough to release air bubbles, knead for a couple of minutes. Divide the dough into 12 equal portions.
- Flatten each dough to roughly the size of the slice of ham you are using. Place a slice of ham, then roll into a log. Connect the two ends of the logs so the dough resembles a snail. Cut the dough into two discs about 80% so the two discs are not totally cut apart. Make the two discs face up so you can see the pretty layers. Place this on a baking tray (I use a half-sheet pan) lined with parchment paper. Repeat for the other 11 portions.
- Let the bread rolls rest for another 1 hour until the volume is about double the original size.
- Preheat oven to 200 Celsius (400 Fahrenheit).
- Mix together 1 egg and 1 teaspoon of water for egg wash. Brush the top of the bread with egg wash, and squeeze/pipe mayonnaise onto each bread roll. Bake in preheated oven for 15-20 minutes until the bread is golden brown.
- Garnish the top of the bread with toasted crushed nori seaweed or chopped fresh parsley leaves. Best served warm when out from the oven.
- Store any leftovers in an air-tight container in the fridge. Simply reheat the bread in a microwave for about 10-15 seconds as needed.


Comments
I've never heard of this dish before but it looks delicious! Have you ever tried mayonnaise with black garlic? I had it once and it was amazing. I think I'd have to try it with this recipe.
The only place I've had black garlic was in a ramen shop and that was truly a delicious experience. But now that you've mentioned pairing mayo with black garlic, I think that should also work wonderful in these bread rolls.
These bread rolls sound so tasty, and I love how easy they are to make. Great for party food or an easy lunch for kids.
Yup, these bread rolls are definitely going to be such a hit with the kids.
These are like the ultimate savory snack!
These look great! Really love how they browned on top.
Wow! What a savory meal; this is making my mouth drool all over my keyboard! Can't WAIT to try these out!
Asian bakery at home?!?! AT HOME?!? Nobody should pass up this recipe! It's great! Nothing beats pulling a tray of glossy, toasty, mayo-hams out of their own oven! When I'm in Asia, I do tend to veer towards these kinds of bakeries- it's sort of a familiar, cheap, convenient food (especially if I'm not good at the language) and savory treats like these are my favorite!
So on with the process! I messed up SO much stuff and they still came out really delicious! Firstly, I got a new little kitchen scale!... but it is not sensitive enough for the small measurements :( So I winged it by using 1tsp yeast, 1 tsp sugar. I think that substitution was adequate- but also the yeast was close to the expiry: I hate throwing away stuff that isn't "spoiled" but yeast can lose potency. The first rise was good, but the second rise (before putting them in the oven) wasn't as substantial. ALSO it should be noted that my kitchen is on the cold, dry side. I think next time I will do the proofs in the oven (off, but with a pot of warm water on the other rack). Yeast recipes are so sensitive!
The other thing was that I used ham that was sliced thick from one of those holiday honey-baked things. I originally planned to make your sausage bread recipe, but I had this to use up! Because it's not a thin slice, I just cut the meat into matchsticks and spread them on the dough. The result wasn't the beautiful swirl, but more "studded" with ham. This turned out pretty okay: plus the mayonnaise will hide any imperfections! Anyway, the last thing I messed up was somehow I cut into it cross-wise and not length-wise. I don't know why I did that! Your picture is good, but for some reason my brain thought that the swirl needs a cross-cut. Lesson learned!
Ultimately, nothing affected how yummy these turned out! I think they could have been a bit more fluffy if I were more attentive to the yeast, but they weren't uncomfortably dense either. The dough itself if flexible enough to do anything with- shapes or fillings. And the mayo baked on the top just looks so... shiny... It's very photogenic, hahaha. I also really liked the yield- it was perfectly one tray of rolls. They seemed like they could freeze well, but maybe not with the mayo topping? I definitely want to make these again, perhaps with some meat floss!
Yeast can be finicky indeed. I find that ever since I store my yeast in a dark colored jar inside the freezer, my yeast seems to perform really well, even after 1-2 months past the expiration date. If you have a spot in your freezer, you can try this trick too, Milky. :)
Oh my goodness, this sounds so good. I now know what I'm going to do with my leftover ham. Thanks!
The best and delicious breakfast option that I could have. Perfect snack any time of the day too.
Seaweed sprinkles!! Omg I that is so cool! They look so tasty and still authentic at the same time. Love the unique style you bring to this recipe!
So when I read the heading for this recipe I was like "wait what? ehm no" but then I continued reading and WOW this sounds amazing. A definite must-try!
Oh my gosh, these look fabulous!! So addictive, I would not be able to just eat one! I've never seen bread rolls like this before, but I must make them as they look so delicious!
Can I make this ahead and store in the freezer until I am ready to bake them?
Hi Joan, I have never tried freezing this particular recipe. For plain (no filling) bread rolls, it is usually doable. After the 1st rise, divide the dough and shape as you wish, then arrange on a baking sheet and freeze, then store the frozen shaped dough in a ziplock bag.
When you want to bake, remove the shaped dough from freezer, and arrange on the baking sheet and let them come to room temperature. It may take up to 5 hours for them to completely thaw and finish the 2nd rise. Then you simply proceed with applying egg wash, mayo, and bake as usual.
Leave a comment