Home / All Recipes / Indonesian / Homemade Tempeh
Homemade Tempeh
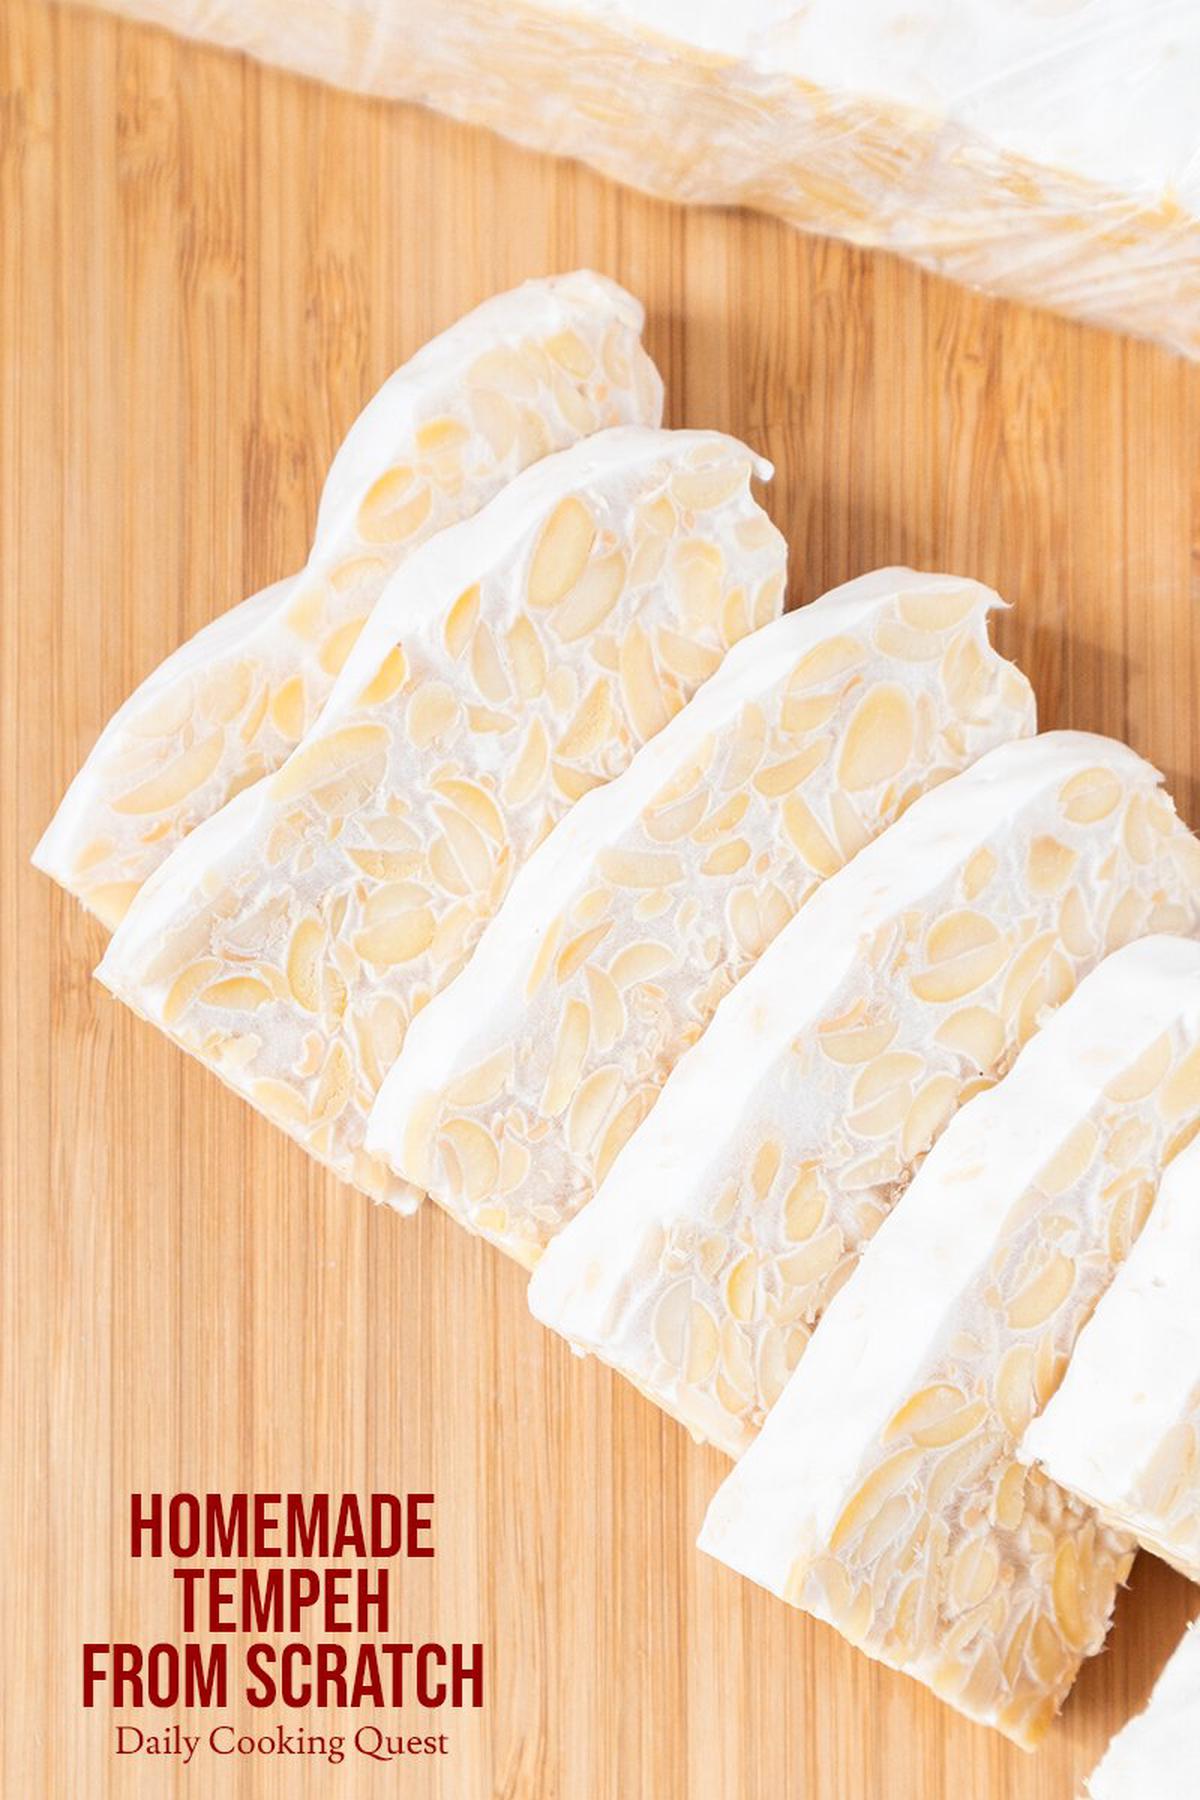
Learn how to make Indonesian tempeh with my complete step-by-step guide, with a detailed explanation to culture tempeh, and tricks to dehull soybean skins.
If you are like me, who loves cooking and coming from Indonesia, then I am willing to bet that you must miss tempeh. Sure some groceries (at least the fancier ones) start to carry them, but they are expensive, and somehow none tastes like Indonesian tempeh. So, if you have been meaning to try making homemade tempeh, I have the just the perfect guide for you.
What you need to make your own homemade tempeh
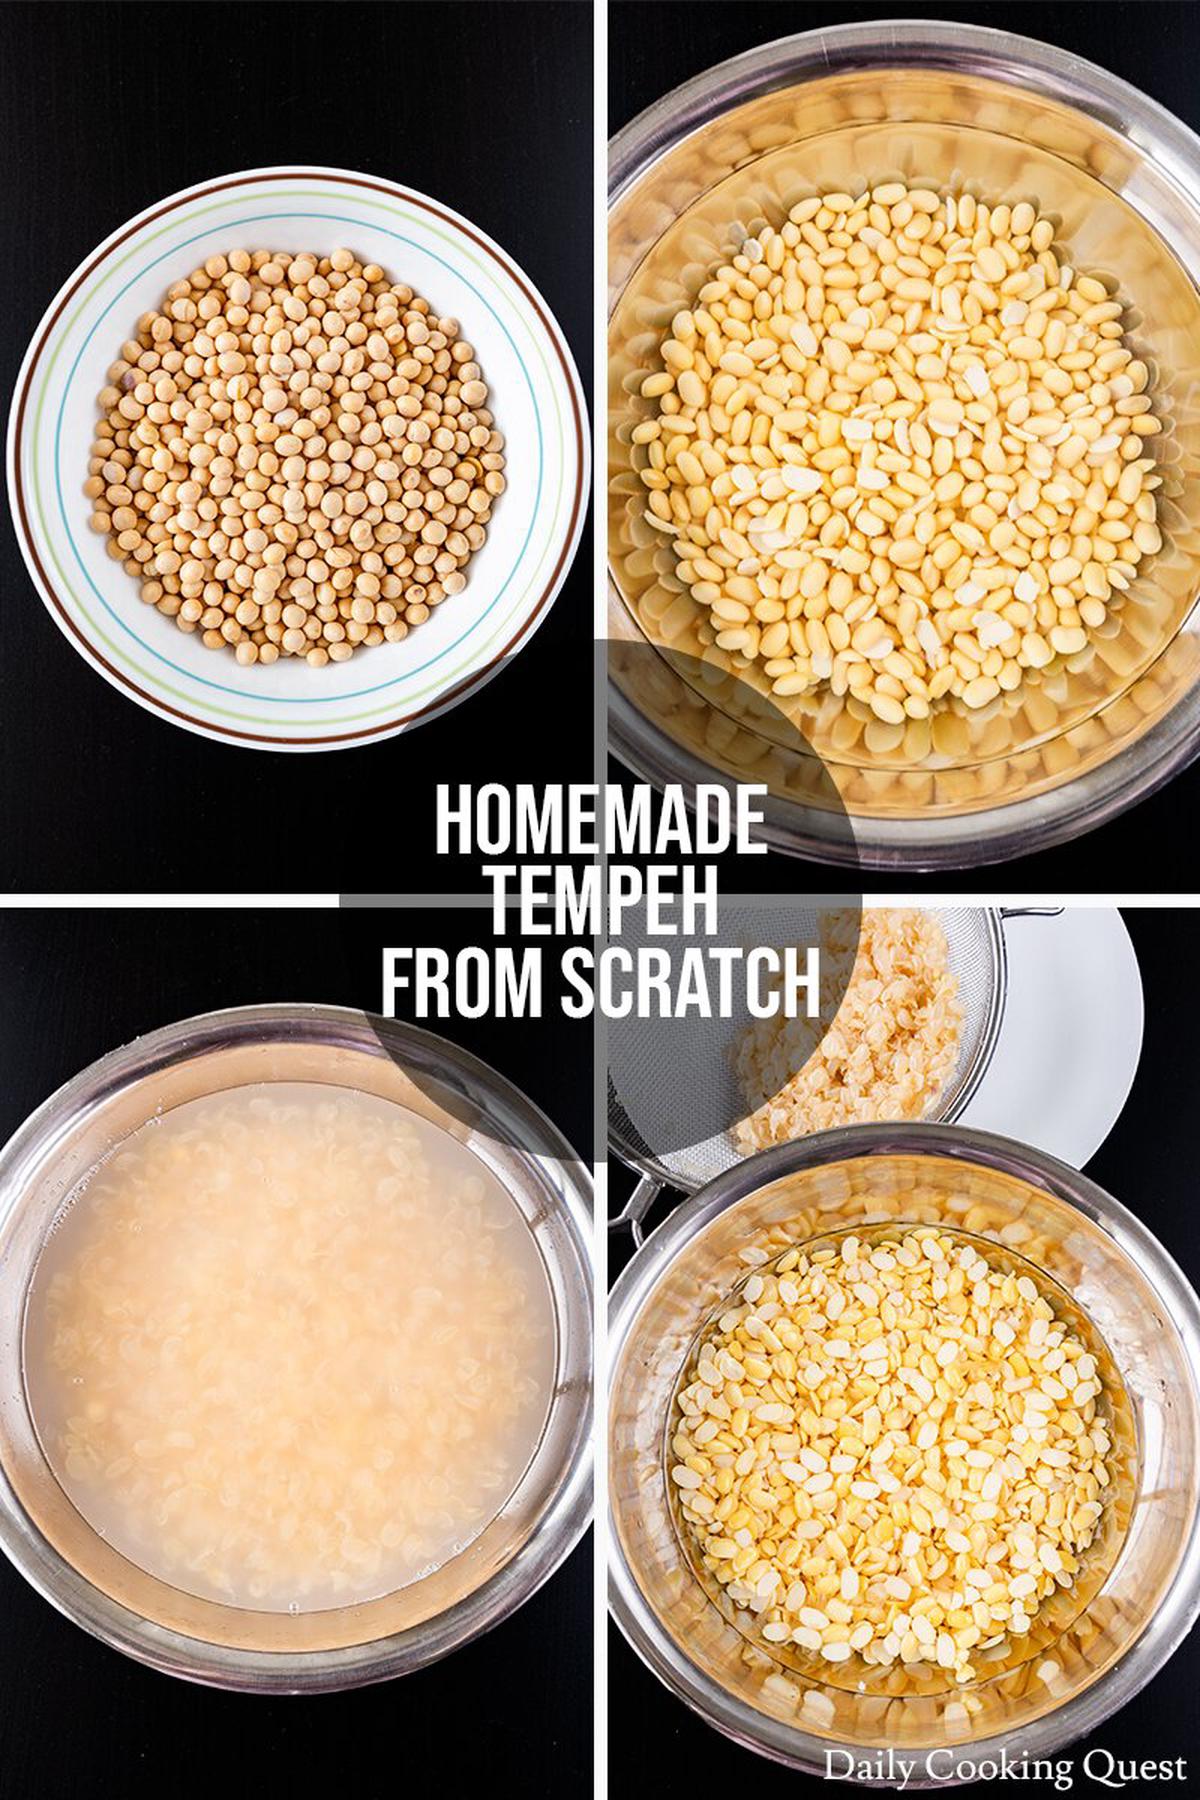
Tempeh is made using 3 ingredients: dry soybeans, vinegar, and tempeh starter.
Soybeans
The better the quality of your soybeans, the more delicious and higher quality your tempeh will be. So if possible, choose non-GMO and certified organic soybeans. They should have a yellow color, uniform in size, and about as big as frozen peas.
Vinegar
You can use white distilled vinegar, apple cider vinegar, or for the most traditional result, cane sugar vinegar.
Tempeh starter
There are several options when it comes to tempeh starter, but ultimately I chose Wira Brand tempeh starter, which comes from an Indonesian company since I really want to recreate Indonesian tempeh.
Also, the quantity of starter in this recipe is developed based on this starter, so if you want to use a starter from another brand, proceed at your own risk.
Tools that I use to make homemade tempeh
Aside from ingredients, here is the list of tools that I use when making homemade tempeh:
- a mixing bowl, a 3-quart is the right size for this recipe
- a stockpot, mine is a 5-quart pot and I think it’s the perfect size
- a fine-mesh skimmer, to scoop out potential scums while boiling
- a colander/strainer
- a baking pan, I use my half-sheet pan, this is to spread out and dry the boiled beans, this one is not a must, but it’s just nice to have a proper vessel
- a kitchen towel/flour sack, this is needed to dry the boiled beans
- a quart-size ziplock bag, to hold the tempeh, though traditionally we use banana leaves for this
- a toothpick/skewer, to poke holes to the ziplock bag so the spores can breath
- a proofer, I have a Brod & Taylor folding proofer to culture my tempeh. It’s super easy to use, simply set the temperature to 31 Celsius (88 Fahrenheit), place the bag of soybeans, and let it culture away for 24 hours. I have never needed more than 24 hours to get a perfectly set tempeh with this proofer.
Make sure that every piece of your equipment is clean, especially so for the ones after the beans finished cooking. Dirty equipments and tools may not only increase the failure of the entire process but more importantly, may spoil the tempeh and make them highly unsuitable for consumption.
How to culture tempeh in an oven
Obviously, most of you who read this article won’t have a Brod & Taylor folding proofer. If you still want to give this a go, you can try making your homemade tempeh inside your oven.
- Place an oven thermometer in your oven.
- Don’t turn on your oven heat, the door closed, and turn on the oven lamp.
- After a while (20-30 minutes), make sure the thermometer register 31 Celsius (88 Fahrenheit).
- If your oven lamp can make your oven reach the desired temperature, then you can just culture your tempeh in your oven, lights on, oven off, door closed.
Most likely the temperature in the oven will be way below 31 Celsius (88 Fahrenheit), and more likely to be around 26 Celsius (78 Fahrenheit). Fret not, it should work.
Traditionally in Indonesia, we culture tempeh in whatever the ambient temperature is with no special proofer/temperature controlling equipment. A 26 Celsius (78 Fahrenheit) is on the cooler side of the day, and 31 Celsius (88 Fahrenheit) is more in the warmer range.
So the lower temperature should work, but be extra patient, since your tempeh may need 36-48 hours to set! Just be ready to not using your oven for that long.
Having trouble dehulling your soybeans to make tempeh?
The biggest time sink that people always grumbling about when making homemade tempeh is not the long culture time, but the ungodly time it takes to dehull the soybeans.
I admit it was relaxing and therapeutic for the first, oh, maybe two times. But repeatedly, it can be soul-sucking and will send you to the internet to search for help!
Here are my two solutions and feel free to choose whichever one you prefer:
1. Set a timer to 30 minutes.
Knead, massage, and dehull the soybeans as best as you can for 30 minutes. You should get the majority of the beans dehulled, and so far, this has yet to fail me.
Confession time, my first two times, I stood and kneaded and massaged and dehulled until I was 100% certain I got every fr!@#ing bean dehulled and that took me like 2 hours!
No more. It’s super unnecessary. But you do need to dehull, or the starter won’t be able to penetrate the beans and your tempeh will never set.
2. Grab your food processor/blender.
If you want an even faster way, once your soybeans have finish soaking. Place the beans and just enough water to cover them in your food processor/blender, give a quick pulse (I count to 3), and then start dehulling.
Now even 5 minutes of dehulling should get rid of the majority of the skins! But you need to accept that the beans will not look nice and intact, they are still tasty though, so it’s still a win in the end.
Is dehulling soybeans necessary?
Now we know that by dehulling, the starter will be able to penetrate the beans and start to culture them into tempeh.
But as long as the skins are not attached, or the skins are bruised and thus the beans are exposed, the starter will still be able to do its job. So even if you cannot 100% remove the skins from your final product, those will just become additional fiber for you to consume, totally not a deal-breaker.
You will hear testimonies or anecdotes that skins in tempeh will make it tastes bad, but so far, each and everyone that I have made tasted the same. And I will be the first to admit that there is just no way to remove 100% of of the skins from your tempeh, so it’s just not true in my opinion. As long as the tempeh set, enjoy them, skins and all.
How long can I store my homemade tempeh?
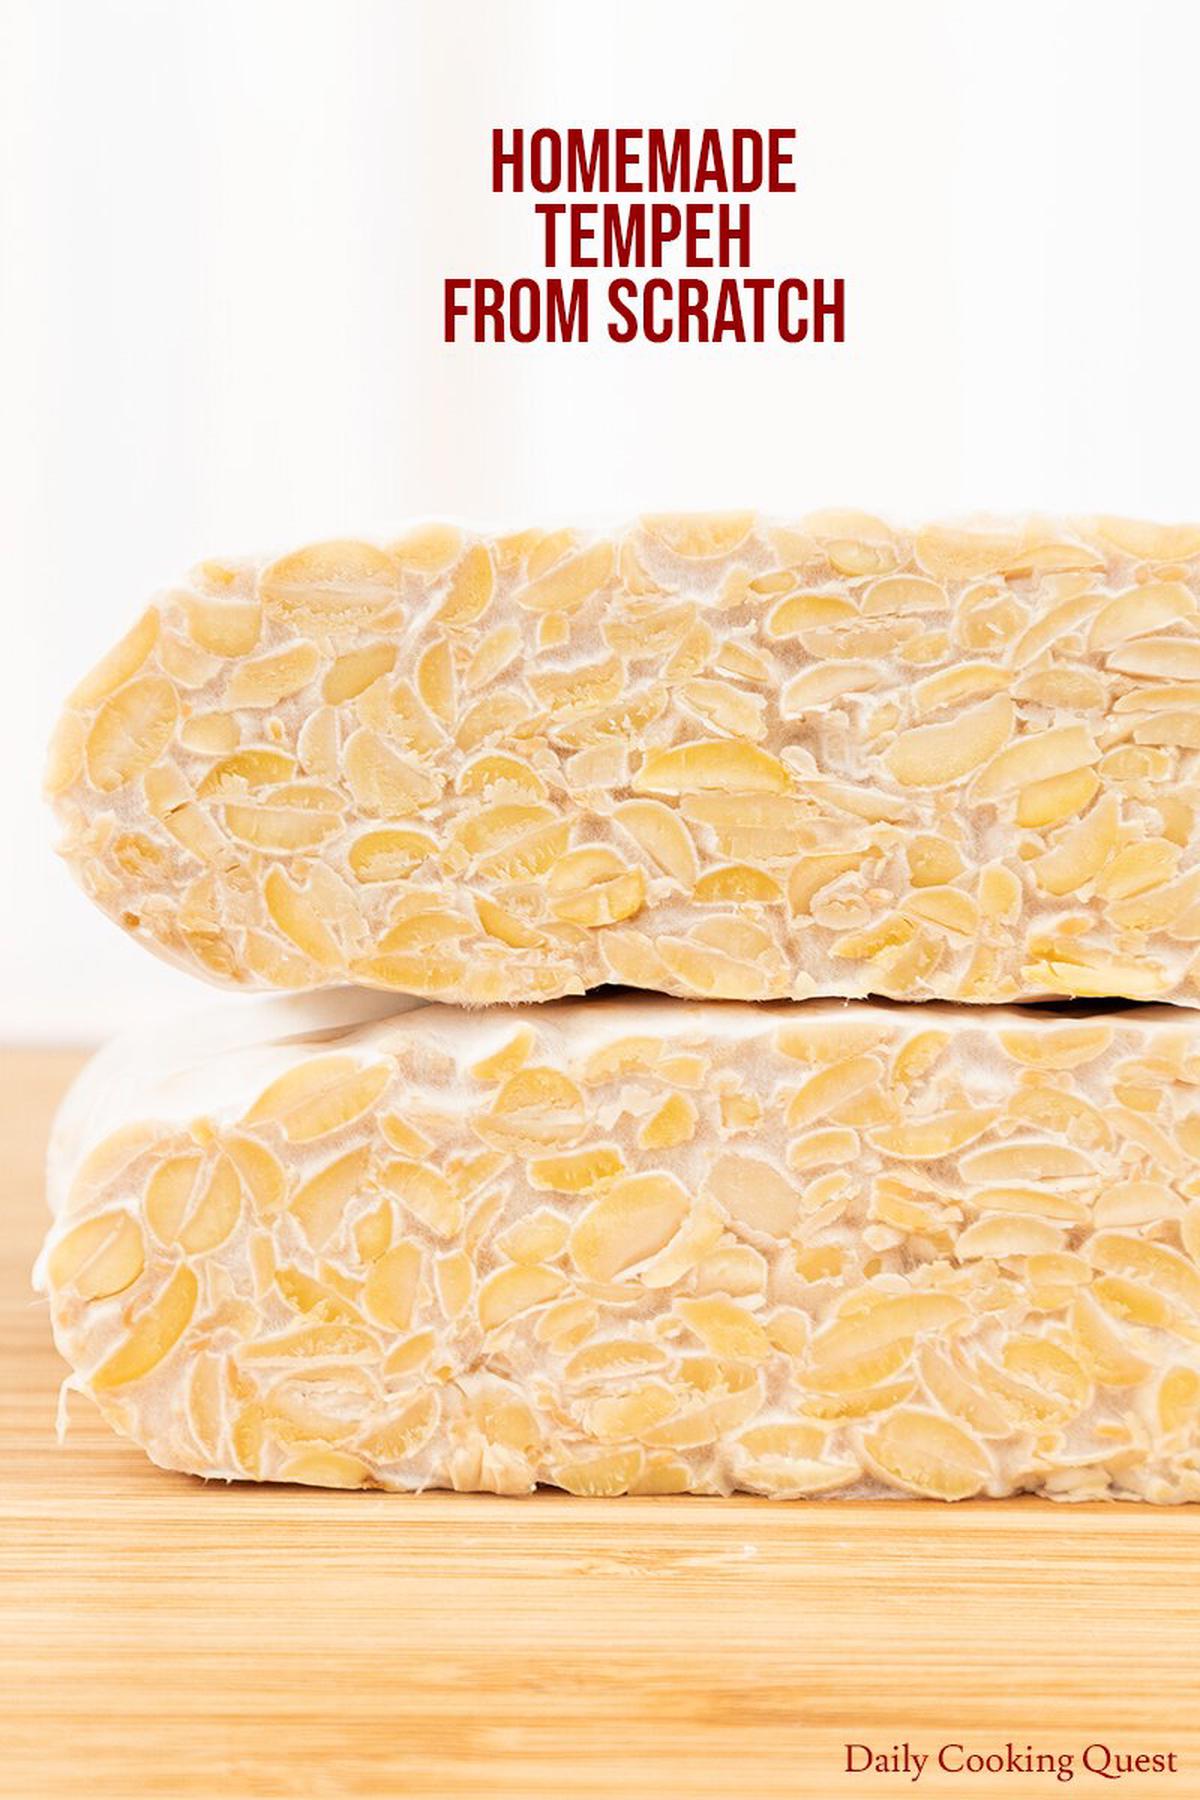
If you are reading this part, then congratulations on your successful attempt at homemade tempeh! Once they are set, you can immediately cook the tempeh and enjoy their nutty flavor. But if you make multiple batches, you may want to store them for later.
- Store in the fridge for up to 10 days.
- Store in the freezer for up to 10 months.
Remember that the ziplock bag has holes right? So before storing, either store them in a bigger ziplock bag (like a gallon-size bag), or wrap each individually with a saran wrap. You really don’t want all your hard work goes to waste from contamination and lead to spoilage during storage.
To use frozen tempeh, I simply take them out from the freezer and thaw in the fridge overnight. Once thawed, you can proceed to use them in your favorite recipe. Or you can try some of my tempeh recipes:
Homemade Tempeh
Ingredients
- 225 gram dry soybeans
- 1 1/2 tablespoon white vinegar, preferably cane sugar vinegar
- 3/4 teaspoon tempeh starter
- Tools
- 1 large mixing bowl (I use a 3-quart bowl)
- 1 stockpot (I use a 5-quart stockpot)
- 1 fine-mesh skimmer
- 1 colander
- 1 baking pan (I use a half-sheet pan)
- 1 kitchen towel (I use a flour sack)
- 1 quart-size ziplock bag
- 1 toothpick/skewer
- 1 proofer(*)
Instructions
- Soak the soybeans: Wash and rinse dry soybeans and place in a large mixing bowl. Top with enough cold water to cover the beans by 2 inches. Leave the beans to soak in the cold water for 12 hours.
- Dehull the soybeans: Use hands to knead and massage the beans to dehull the skins, swirl the water so the skins float to the top, carefully tip the bowl to discard the skins (along with some water). Top with more cold water and repeat the dehulling process several times.
NOTE: This can take a lot of time, but I usually set a timer and call it done after 30 minutes. - Boil the soybeans: Transfer the dehulled soybeans to a stock pot. Top with cold water by about 4 inches. Bring to a boil, then lower the heat to a simmer, cover the pot, and simmer for 30 minutes.
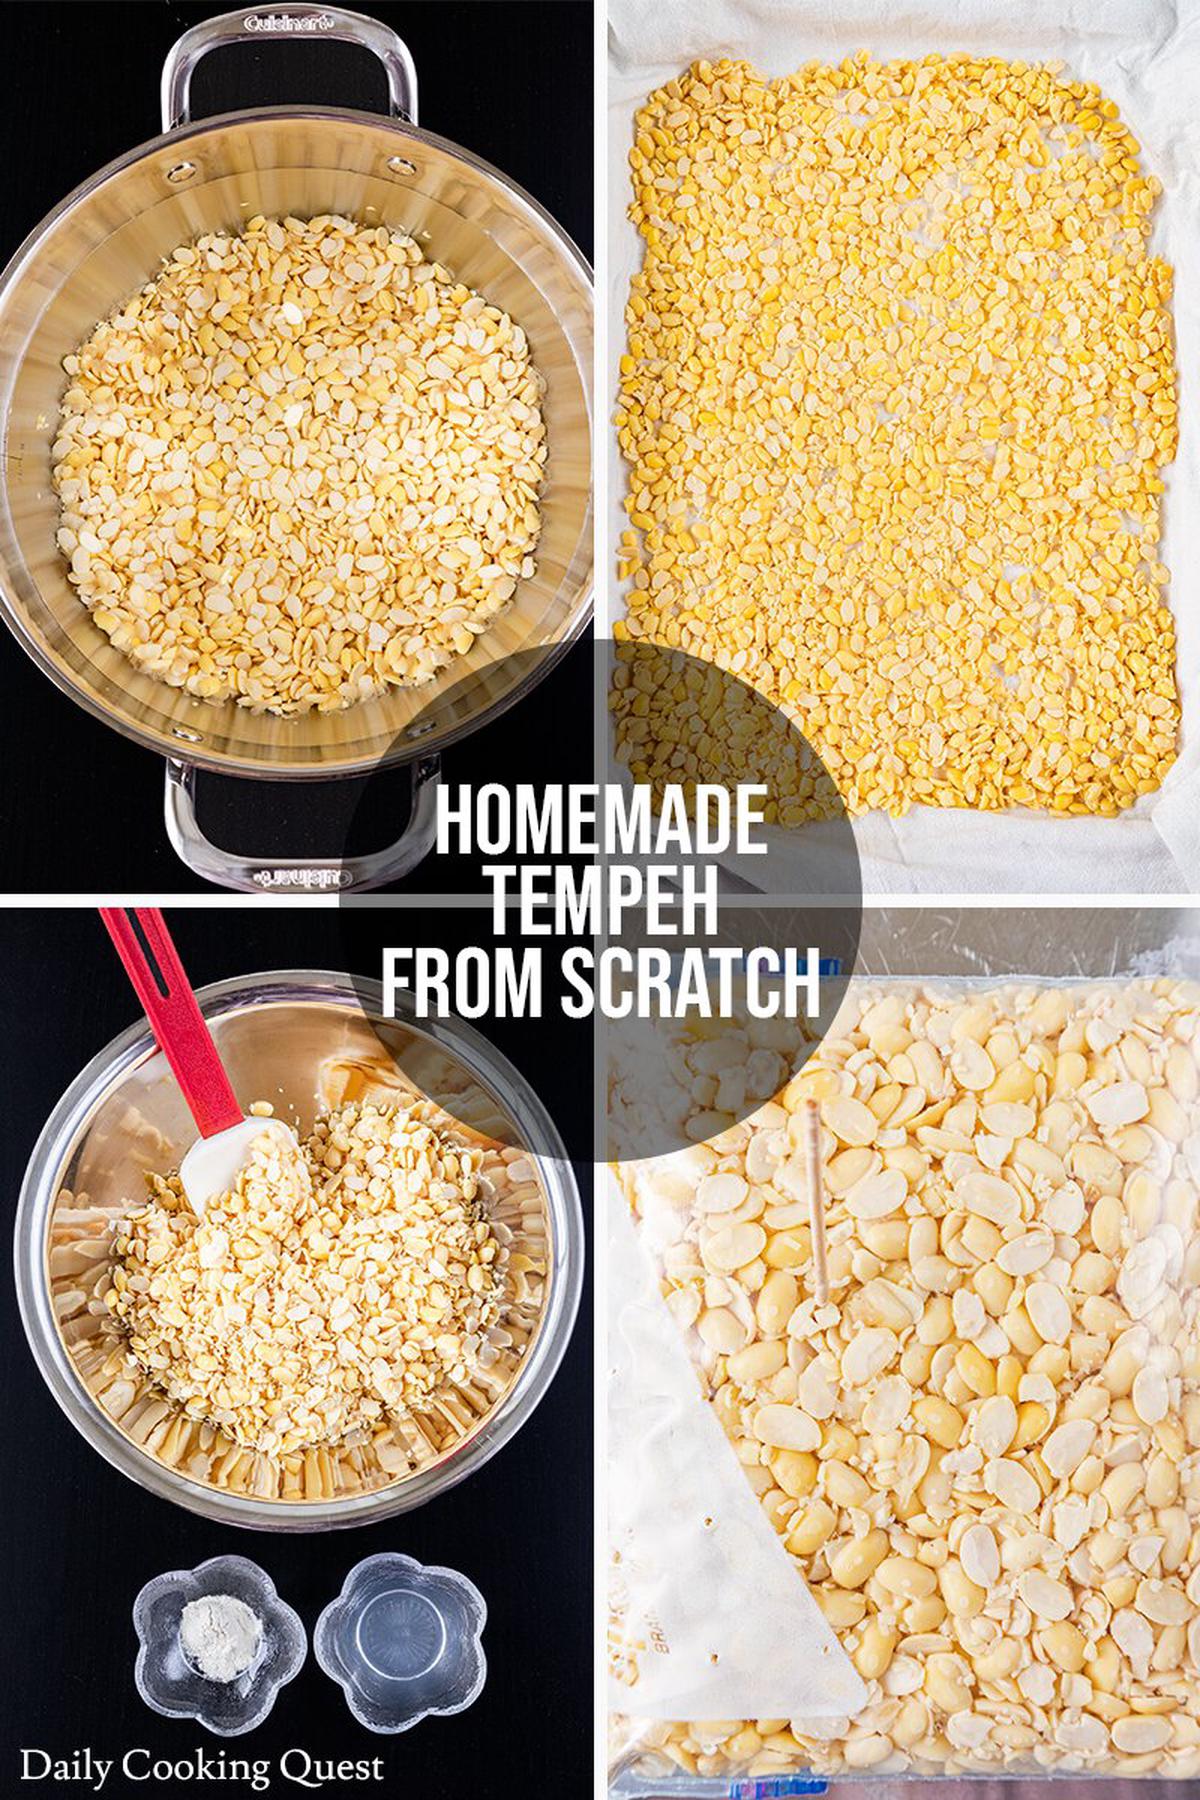
NOTE: Just before the water boils, you may notice all the remaining skins float to the top, use a skimmer to remove these. - Dry the soybeans: Lay a kitchen towel over a baking pan. Drain the boiled soybeans using a colander, then transfer the drained soybeans to the prepared baking pan. Pat dry with the kitchen towel and set aside to cool to below body temperature.
NOTE: Try to pat the beans as dry as possible since the risk of failure increases if the beans are not dry to touch before your proceed with the rest of the steps. - Add vinegar: Transfer the soybeans into a clean and dry mixing bowl. Add the vinegar and mix well.
- Add tempeh starter: Add tempeh starter to the beans and mix well.
- Transfer to a ziplock: Transfer the beans to a ziplock bag and fold the bag so that the thickness is about 1 inch.
- Prick holes: Use a toothpick or a skewer and poke the bag all over to create holes. A 1-inch interval holes should be plenty. This will allow the starter to breath.
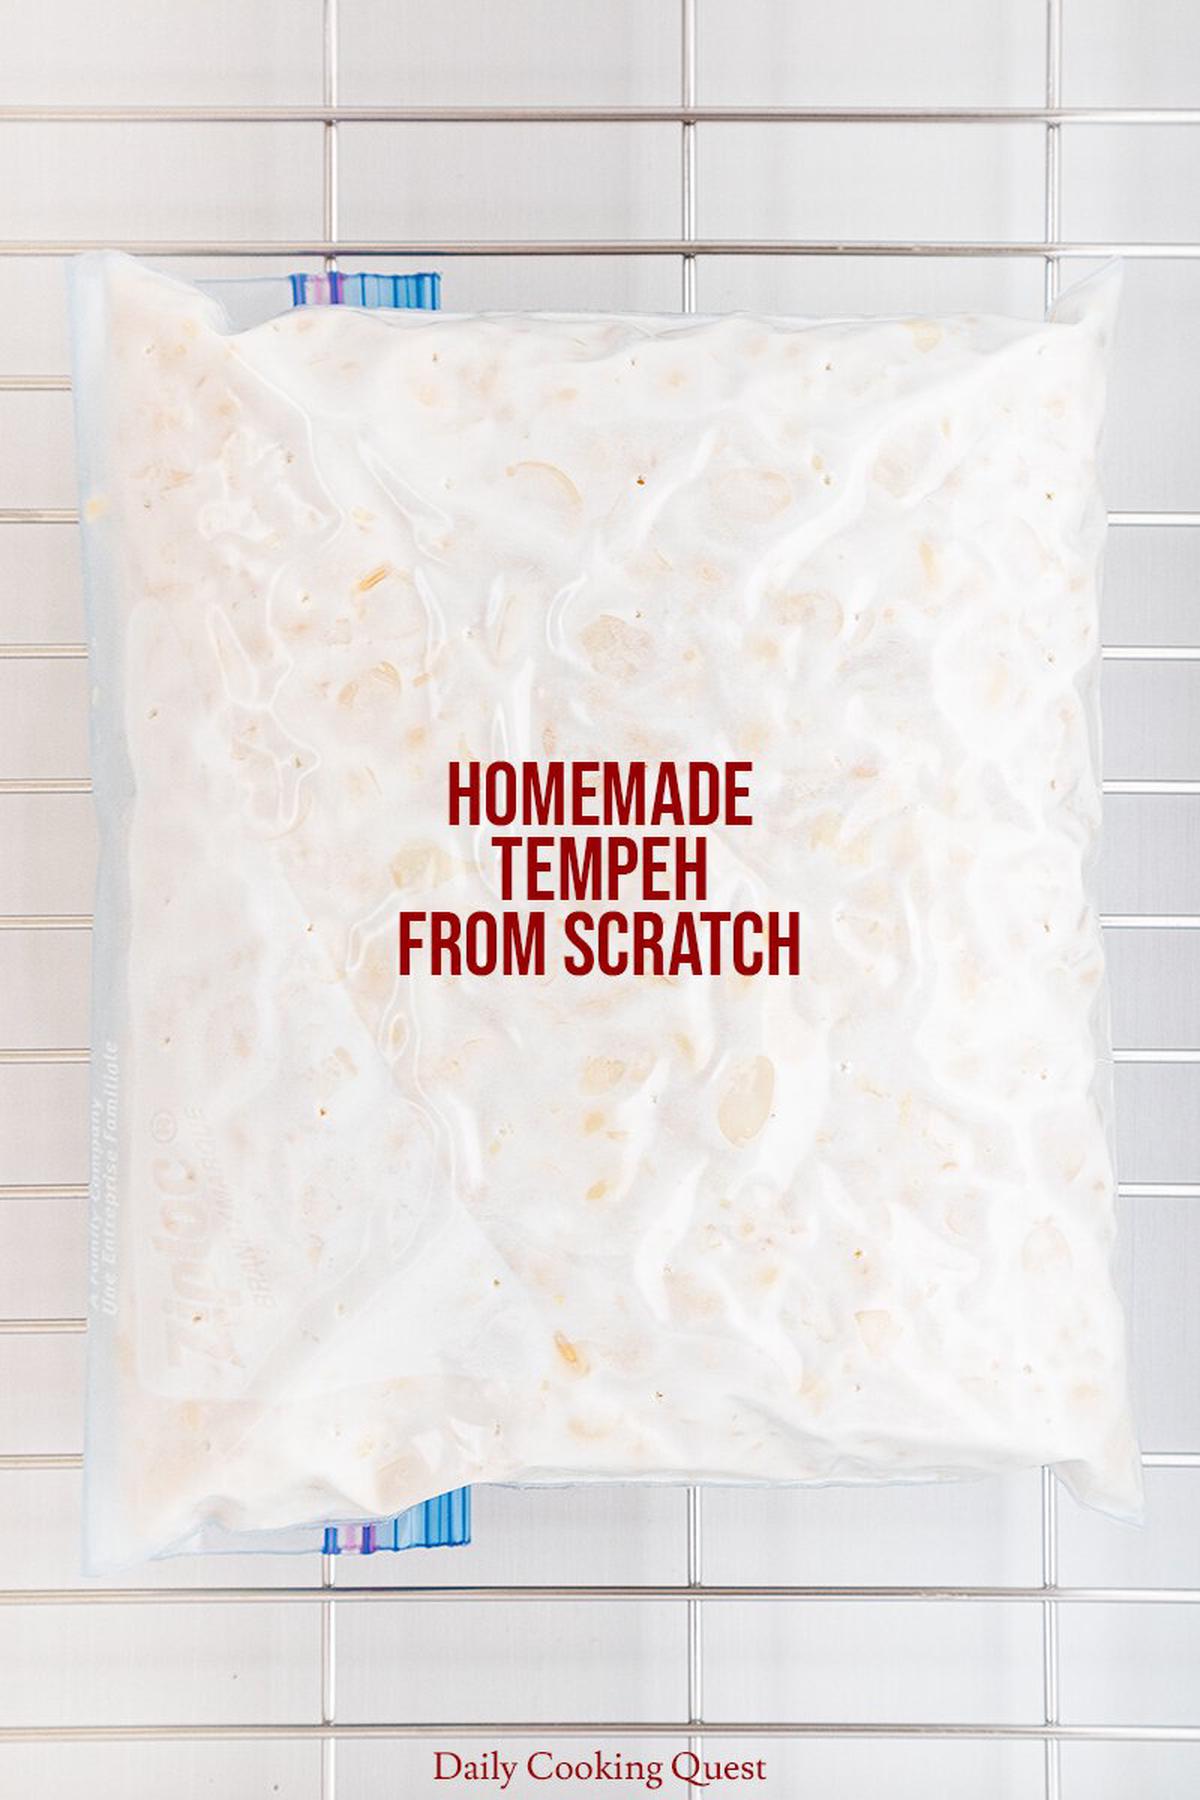
- Culture for 24 hours: If you use a proofer like me, set the proofer temperature to 31 Celsius (88 Fahrenheit), and place the bag of beans into the proofer. After 24 hours, it should have turned into a solid mass of tempeh where the beans are held together by white spores.
NOTE: If it hasn't turned into a solid mass after 24 hours, let it culture for another 12 hours and up to another 24 hours.
Notes
- (*) Some people culture the tempeh in an unheated oven with the oven lamp turned on. You are free to try, but grab an oven thermometer to verify that it is indeed 31 Celsius (88 Fahrenheit). Or at the very least 26 Celsius (78 Fahrenheit), in which case be ready to culture your tempeh for 36-48 hours.
- TIME: My stupid recipe card only has prep time and cook time. The more correct time is this: (1) 12 hours to soak the beans, (2) 30 minutes to dehull, (3) 40 minutes to boil, (4) 30 minutes to dry, mix vinegar and starter, and bag the bean, (5) 24 hours to culture, and possibly up to 48 hours. Your total time will be about 38 hours (24 hours culture) to 62 hours (48 hours culture).


Comments
Something informative and a must try option. Thanks for the recipe.
This was so helpful - I had no idea how to make tempeh at home but this guided me through the entire process from start to finish!
Tempeh looks awesome. I was reading every letter in your post. It was so informative. And the dehulling tip is great. 2 hours vs 5minutes. I take it.
I know right? So what if the beans are not intact? The tempeh still turns out tasty in the end. :)
I've just tempeh in a few recipes and loved it, I've never tried to make my own though. This is such a great guide for making tempeh, I can't wait to give it a go.
Oh wow! I have never seen a recipe for making this from scratch before!! I love this. The steps and method are very clear, thanks for such a great guide, I think I will give it a go, hope it turns out as well as yours did!! Thanks
Food processor it is! Can't wait to try *fresh* tempeh for the first time.
THIS is awesome, I have always wanted to make tempeh! I am excited at how easy this recipe is!
Thank you for the easy to follow tips! I feel like I can tackle tempeh as a newbie!
Wow I never tried making tempeh at home before this! Your recipe looks so easy to follow. I am giving it a go soon!
Thank you Anita! I made tempeh for the first time because of this site. It was as good as one I had in Bandung or even better to make it your own. So moist and tasty, unlike the ones you get from groceries in the states. Your other recipes inspire me. I am also from Indonesia and Chinese decent. I grew up in Bandung with Sundanese food as my base (sambal terasi & lalab, gorengan: tahu, ikan or tempeh!) when i was growing up. It's good that you have this site. You must spent a lot of time on these recipes. They look good with great instructions.
Yay! I'm so happy you can successfully make your own homemade tempeh with my recipe, Purna. :) Indeed it took me a lot of time on this blog, especially on this particular recipe. Took me months before I perfected this one, but it's so worth it if other people find it useful too.
This is on my to make list for this week. I think it will be fun to make. I am getting the kids involved because they love tempeh as well!
I am so happy I came across this post - now we have something fun and new to do this weekend! Thank you!
Wow, I've never made this recipe before until now! The flavors are so delicious in and I love the chewy texture :)
I love learning traditional recipe from around the world. Thank you so much for sharing this!
I've actually never made Tempeh before but you've made it look so easy! Can't wait to try the recipe :)
Tempeh is so expensive where I live. I didn't know it's this easy to make. Thanks for such a clear guide!
This post was so incredibly informative. I really think I will be able to master it from here.
Homemade tempeh -who knew? Can't wait to try!
I am so interested in this! I've never actually heard of what tempeh is and love to have learned something new today :) I am definitely going to try this!
I used the instant pot to cook the soy beans 40 minutes which eliminates the overnight soaking. The dehulling can be done afterwards. I am able to make the entire recipe within an hour and a half while taking my time. Thanks for the recipe and tips. I use the oven with light method which works well for me. Depending on the outside temperatures, it can take up to 48 hours to be done. Having grown up in Indonesia and eating this all my life, I’m thrilled to be able to make this. It turns out oh so much better than store bought.
I`ve used a dehydrator and the lowest setting is 35°C is that still fine? I´ve left it in the dehydrator for 22 hours and now Im leaving it at room temperature for another 14 hours. Would appreciate your advise :-) Thanks!!! Nina
Hi Nina, I haven't tried using a dehydrator to make tempeh before, though I think it can work. After 22 hours, has your tempeh turned into a solid cake? If yours looks very close to the photo, I would say it is done. It is also very possible you won't need to wait for the whole 14 hours at room temperature. I usually judge for its doneness more from how it looks (i.e. a solid and firm to touch cake).
Where can I find the tempeh starter in spore please
Hi Pearl, I am not based in Singapore, but a quick search using Google gives me several results: :https://www.carousell.sg/p/tempeh-starter-cultures-164894747, https://www.craftculturesg.com/products/cultures-for-tempeh, and even this one from Amazon Singapore https://www.amazon.sg/Cultures-Health-Alternative-Oligosporus-Preservatives/dp/B016C02XUQ. Good luck. :)
Is it possible to process the beans to get a smoother, more uniform texture rather than the individual soy beans texture?
You can go for it if you want to. Just pulse/grind the bean in a food processor/blender to get the texture you want.
Leave a comment